The unit administration page allows a user with admin rights to see and manage settings associated with the unit.
Details
The details menu provides an overview of the unit.

How to rename a unit
- Write the new name in the textbox.
- Press the Change Name button.
API Secrets
The API secrets menu allows you to manage the API secrets used for accessing the API of the unit. For more information about the API read the API reference.

How to create a new API secret
- Write the name of the new secret in the Enter new secret description here textbox.
- Press the New Secret.
How to rename an API secret
- Change the name of an existing API secret in the textbox.
- Press the ✓ button.
- Press the Confirm button in the dialog box.
How to renew an API secret
- Press the 🗘 button.
- Press the Confirm button in the dialog box.
How to delete an API secret
- Press the ✖ button.
- Press the Confirm button in the dialog box.
Administrators
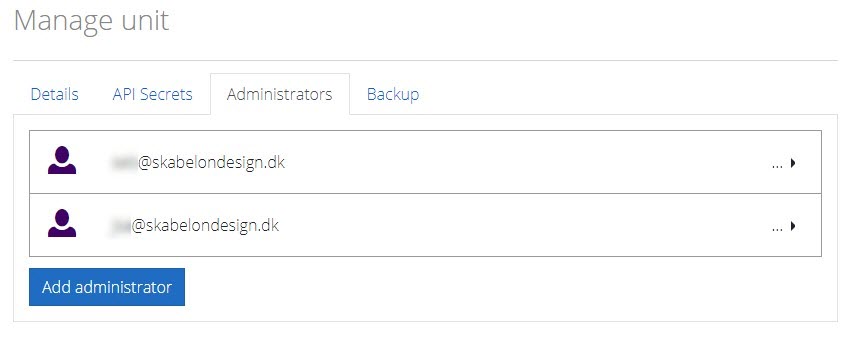
The administrators menu provides an overview of users with admin rights for the unit. Users with admin rights to the organization also have admin rights to all units in the organization. To see how to administrate organization administrators, refer to organization administration.

How to add an administrator
- Press the Add administrator button.
- Type the email of the user you want to add as an administrator.
- Press the Ok button.
How to remove an administrator
- Press the … 🢒 of the administrator that you want to remove.
- Select the Remove from unit option in the menu.
Backup
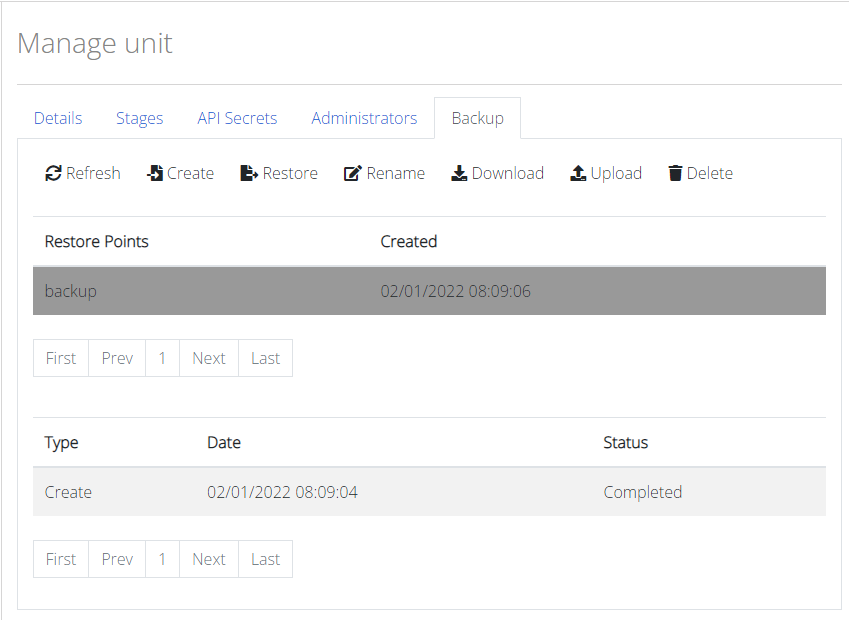
The backup menu provides an overview of currently available backups and a history of creation and restoring of backups. The first list is the available backups for restoring and the second list is the history of backup tasks of the unit.

Backup tasks
Creation of a backup and restoring a unit is handled through tasks. This means they are not immediately executed, but instead added to a queue shared by all units.
| Scheduled | Task has been added to the queue and is waiting to be accepted by the service. |
| Running | Task has been accepted by the service and is getting executed. |
| Completed | The task finished without any errors. |
| Failed | Something went wrong while executing the task. Failures are caused by internal errors and you should contact support for assistance. |
How to create a new backup
- Press the Create Backup button.
- A new entry will be added to the task list, showing the task has been scheduled.
- Once the task has been accepted, the status will change to Running.
- Once the task is finished, the status will change to Completed and the backup will be displayed under Restore Points. The date of the backup is when the task started running.
How to restore a unit
- Select a backup in the restore point list.
- Press the Restore Unit button.
- A new entry will be added to the task list, showing the task has been scheduled.
- Once the task has been accepted, the status will change to Running.
- Once the task is finished, the status will change to Completed. The unit has now been restored.
How to delete a backup
- Select a backup in the restore point list.
- Press the Delete button.
- Press the Confirm button in the dialog box.
How to filter the task list
- If the column filters are not visible, press the
 button.
 - Write what you want to search for in the filter of the column (filtering is not case sensitive).
- Press the Enter key to perform the search.
Stages
The Stages menu allows you to manage stages for a unit, where creating, deleting, and renaming are possible actions.

How to create a new Stage
- Enter stage tag in the Enter new stage tag here textbox.
- Press New Stage button.
Stage tags must be unique. Once the stage has been created a stage ID is generated and is shown to the right of the stage tag.
How to rename a Stage
- Change the name of an existing Stage in the textbox.
- Press the ✓ button.
- Press Confirm in the dialog box.
Stage tags must be unique.
How to delete a Stage
Prerequisite: a Stage that has been assigned to a version cannot be deleted, and the button is disabled, as shown for Stage prod in the image above.
- Press the ✖ button.
- Press Confirm in the dialog box.